I recently tried to update my laptop’s Linux installation from the BIOS Compatibility Mode to UEFI. I wanted to do it so I could update the laptop’s firmware with the UEFI capsule system and fwupdmgr(cool system by the way). Little did I know i was in for a ride.
The process is quite complicated to do manually and is especially sensitive as doing it incorrectly will destroy my data. Restoring a whole disk backup takes a huge amount of time so it is best to avoid it.
I started by having a look at this Community Help Page which had a helpful section called “Converting Ubuntu into UEFI mode“. Quoting the section:
- Start Boot-Repair, click on “Advanced options”, go to the “GRUB location” tab.
- If you do not see a “Separate /boot/efi partition” line, this means that your PC does not have any UEFI partition. In this case, exit Boot-Repair, then create an UEFI partition (see the “Creating an UEFI partition” paragraph above).
- If you see a “Separate /boot/efi partition” line, tick it then click the “Apply” button.
- Set up your BIOS so that it boots the HDD in UEFI mode (see the “”Set up the BIOS in UEFI or Legacy mode” paragraph above).
I assumed Boot-Repair could do it’s job while the system was up. I did not have much faith in this assumption but believed boot-repair could add some entry to grub, and load a special initramfs which would do the magic. Unfortunately it did not have such abilities. Fortunately, it was upfront about it and gave a suggestion to run the software in a live CD, as in the message below:

I proceeded to try to download the latest Ubuntu livecd ISO from Canonical. Kagi(my search engine) did not return the immediate link, but neither did google. The first hit from Canonical is a tutorial that has no direct link to download the ISO. Instead it has links for how to prepare live usb drive for a multitude of operating systems like in the picture below.

It was disappointing as I needed to read the whole text to get an idea of how to proceed to get the ISO. So I clicked on “Create a bootable USB stick for Ubuntu“…and I get another tutorial!

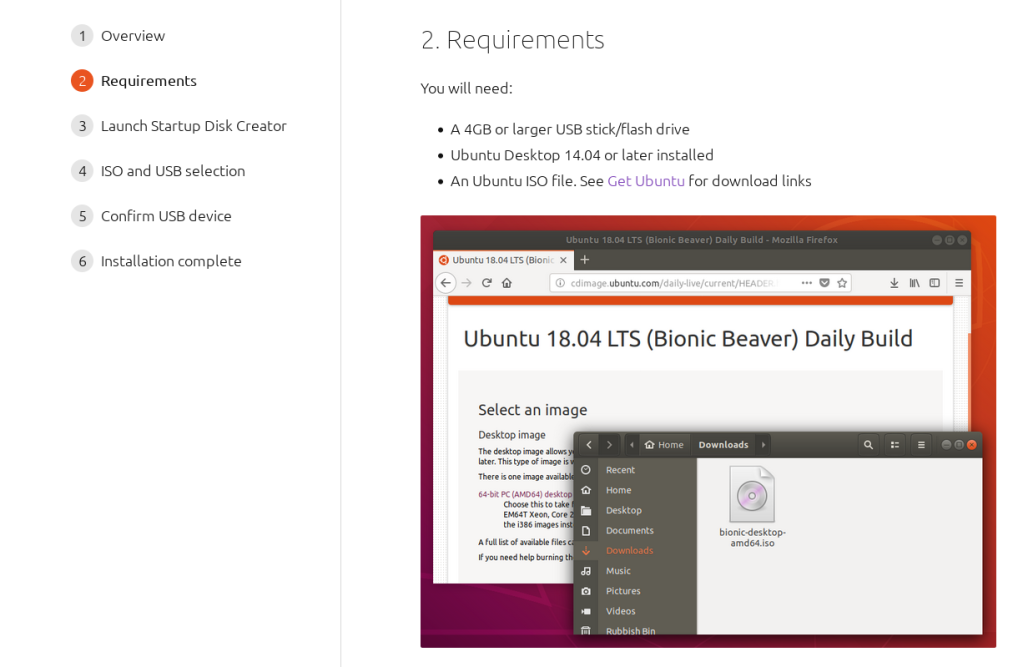
Notice that again this is a “web app” style dialog where I need to click on the right step to get to the actual live cd download link. I know this is an attempt at being friendly but this removed the ability to just scroll the information naturally. It also removes the ability to search on the whole page, in browser as well as on the search engine. Can you find what is the “page” that contains the link to get Ubuntu? By searching for ISO I hit “ISO and USB selection” as in the picture, but going that road did not lead me to the ISO. It took me 3 page navigations attempts to guess it is in page 2 (Requirements):
Eventually I found the liveusb ISO . This is where the step by step instructions actually go the extra mile of promoting the “Make Startup Disk” tool which simplifies the process of making a live USB disk. Without the extra help I would have just used unetbootlin or even better just run dd into the USB device, but that would be the hard way and I wanted to stick to the beaten path. The above mentioned issues in finding the ISO are a nuisance even so. The ride will start further down.
Armed with my USB Live Ubuntu disk I prepared my computer to boot it instead of my normal disk. I booted it in BIOS compatibility mode and it booted up normally into Ubuntu.
If you followed the community link for boot-repair you might have noticed that it is not part of the included livecd‘s software nor even Canonical’s repositories. This means that the internet needs to be configured and the external repository added. To add the repositories it is something simple like:
# sudo add-apt-repository ppa:yannubuntu/boot-repair && sudo apt update
# sudo apt install -y boot-repair
With boot-repair installed I tried again to run it with the instructions mentioned in the community help page. This time though it failed because it could convert to UEFI Grub while in BIOS mode. I do not have the screenshot but it is similar to the error modal shown above with different text. It was fair that I needed to be in UEFI mode to convert to it. Maybe some validation or efivars.
Restarting the computer I go to my BIOS menu and configure the boot mode to use UEFI and the LiveUSB disk. And…it panics! As found in askubuntu the error is the following:
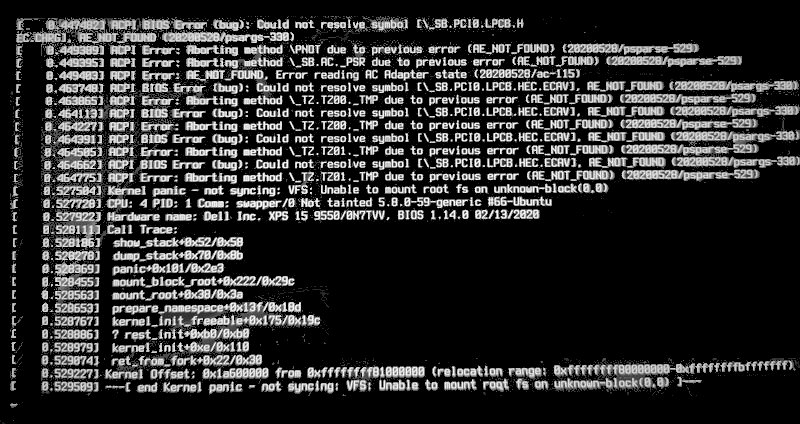
I pity the poor intrepid Linux newbie that tries to run the latest(April/2022) Ubuntu live CD. I am an expert Linux user and professional and this error is horrifying. How was it possible that the kernel cannot mount root? Unknown-block(0,0) is the USB disk identifier provided by Grub(The live USB bootloader). If I did not remove the USB drive then something else must have occurred. Let’s analyze what else did it show?
ACPI errors. Spoiler, they are all irrelevant, further drowning the hypothetical newbie in issues.
There was only one possibility left. This was a ramdisk and we got out of memory. There is a bug report of such an issue here, and the report indicates it is due to the 4K screen requiring a too a big console frame buffer at that point of system boot up. One of the manifestations of this too-big-framebuffer is that grub interaction is very slow with a noticeable delay between user input and it’s presentation. I had this delay issue in grub for ages in my regular Ubuntu installation and never thought this was due to grub choosing the maximum resolution reported by videoinfo. Given the existing reports that high resolution displays of grub console are rendered extremely small in 4K screens I do not know why Canonical does not hard-set a safe maximum resolution that grub can run at. This would solve the issues with input delay, framebuffer out-of-memory, and terrible accessibility.
With this knowledge I then tried to change the live USB disk grub resolution myself.
To set a specific resolution on grub one needs to change gfxmode. gfxmode sets the resolution used on the ‘gfxterm’ graphical terminal.
To change gfxmode in grub there are plenty of accurate tutorials around. It goes something like this:
sudo bash -c "echo 'GRUB_GFXMODE=800x600' >> /etc/default/grub"
sudo grub-update
Coming back to the livecd issue, one might scratch the head and come up with the question “How do i update grub settings of an ISO?”. The issue is that as one reads about the ISO file format, one finds that it is a read-only format and any change will require specialized software. That is way outside the scope of what we originally proposed ourselves to do: Boot a live disk in UEFI to install this magical program called boot-repair. In frustration i tried the command below just to confirm that it is indeed a read only file system and any changes to grub configuration were not easily done:
sudo mount -o remount,rw /media/pneves/Ubuntu\ 20.04.4\ LTS\ amd64/Being in a dead end, I started my typical random walk around the topic. It is a very pedagogical activity but takes a lot of time. In this random walk i started to think that maybe I can do the magic of boot-repair by myself, so I go to it’s project page to try to peek at the the source code. And… There is none(Concerning I know!). This is what can be found:
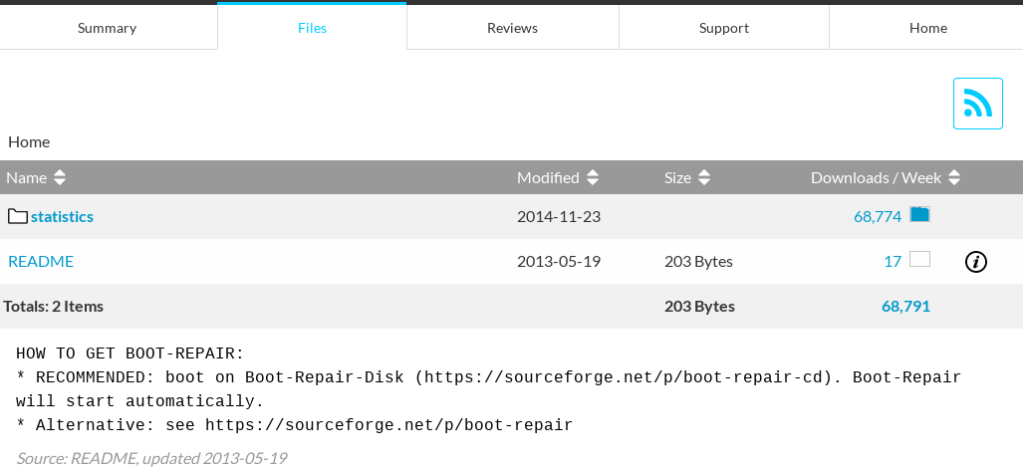
The README is very old, 2014, but very helpful regarding our problem. It recommends the download of a Repair CD that includes boot-repair. This means no need to configure the internet nor extra Ubuntu repositories while on the live disk. It worked flawlessly!
There is not much more to say about it. The LiveDisk and boot-repair executions were as easy and without surprises as possible. The OS looks like an old version of Fedora but it does the job. With the conversion of MBR/DOS partition to GPT and UEFI done, the Dell XPS15 9550 recognized my main disk as an UEFI system and I was ready for my UEFI capsule upgrade.
Basically the Repair CD did what I would expect Canonical’s Ubuntu LIve Disk to do. Extra points for the link being in an simple and old README file.
